If you are like me, you love to cook and eat. But you also hate to deal with multiple appliances that take up a lot of space in your kitchen and a lot of time in your life. You wish you had one device that can do it all: microwave, air fry, bake, roast, broil and defrost. Well, guess what? Your wish has come true. Meet the Toshiba 6-in-1 Microwave/Air Fryer Combo. This amazing device is a game-changer for any home cook. It can make everything from crispy chicken nuggets to moist chocolate cake with just one touch of a button. It can save you space, money and time. It can make your food healthier, tastier and faster. It can give you more options, creativity and fun. It’s the ultimate cooking device that you need in your kitchen.
In this article, I will show you how to use the 6 functions of the Toshiba 6-in-1 Microwave/Air Fryer Combo and how they can revolutionize your cooking experience. I will also give you some tips and tricks, some examples of dishes and some FAQs about this device. By the end of this article, you will be ready to unleash your inner chef and enjoy the best food of your life.

How to use the 6 functions of the Toshiba 6-in-1 Microwave/Air Fryer Combo
Microwave
The microwave function is the most basic and common function of the device. It uses electromagnetic waves to heat up the food molecules quickly and evenly. It is ideal for reheating or defrosting food that has already been cooked or for cooking food that does not require browning or crisping. Some examples of food that can be microwaved are:
- Soups, stews, curries, sauces and gravies
- Rice, pasta, noodles and grains
- Vegetables, fruits and salads
- Eggs, cheese, milk and yogurt
- Bread, tortillas, muffins and pastries
- Popcorn, nuts and seeds
- Coffee, tea and hot chocolate
To use the microwave function, follow these steps:
- Place the food in a microwave-safe container or dish and cover it with a lid or a vented plastic wrap.
- Place the container or dish on the glass turntable in the center of the device.
- Select the microwave mode by pressing the “Microwave” button on the control panel.
- Set the time and power level using the “+” and “-” buttons or use the smart sensor function by pressing the “Sensor Cook” button and selecting one of the 10 preset menu options for common foods such as popcorn, pizza, potato and more.
- Press start and wait for your food to be ready. The device will beep when it’s done.
Air Fry
The air fry function is one of the most popular and innovative functions of the device. It uses hot air circulation and a small amount of oil to create a crispy and crunchy texture on the food surface while keeping it moist and tender inside. It is ideal for making fried food with up to 75% less oil than deep frying. Some examples of food that can be air fried are:
- Chicken nuggets, wings, tenders and drumsticks
- Fries, wedges, chips and tots
- Onion rings, mozzarella sticks, jalapeno poppers and nuggets
- Donuts, churros, funnel cakes and apple fritters
- Vegetables such as broccoli, cauliflower, zucchini and carrots
To use the air fry function, follow these steps:
- Preheat the device for a few minutes by selecting the air fry mode by pressing the “Air Fry” button on the control panel and setting the temperature to 400°F using the “+” and “-” buttons.
- Spray or coat the food with a thin layer of oil using an oil sprayer or a brush.
- Place the food in a single layer in the air fry basket without overcrowding it. Leave some space between the food pieces for better air circulation.
- Place the air fry basket on the glass turntable in the center of the device.
- Set the time using the “+” and “-” buttons or use one of the preset menu options for common foods such as fries, nuggets, onion rings and more by pressing
- Press start and wait for your food to be ready. The device will beep when it’s done. You can check the food halfway through the cooking time and flip or stir if needed for even browning.
Bake
The bake function is another popular and versatile function of the device. It uses hot air to cook the food evenly and create a soft and moist texture inside and a golden and crusty texture outside. It is ideal for making baked goods such as cakes, pies, cookies, brownies, muffins and more. It can also be used to make casseroles, lasagna, pizza and more. Some examples of food that can be baked are:
- Chocolate cake, carrot cake, cheesecake and banana bread
- Apple pie, pumpkin pie, pecan pie and lemon tart
- Chocolate chip cookies, oatmeal raisin cookies, peanut butter cookies and sugar cookies
- Brownies, blondies, fudge and bars
- Muffins, scones, biscuits and cornbread
- Casseroles, lasagna, pizza and quiche
To use the bake function, follow these steps:
- Preheat the device for a few minutes by selecting the bake mode by pressing the “Bake” button on the control panel and setting the temperature using the “+” and “-” buttons. The recommended temperature range is between 300°F and 425°F depending on the type of food.
- Prepare the food according to your recipe and place it in a baking dish or pan that fits inside the device. You can use metal, glass or ceramic bakeware as long as they are oven-safe.
- Place the baking dish or pan on the baking tray that comes with the device.
- Place the baking tray on the glass turntable in the center of the device.
- Set the time using the “+” and “-” buttons or use one of the preset menu options for common foods such as cake, pie, cookie and more by pressing the “Menu” button and selecting one of the 10 options.
- Press start and wait for your food to be ready. The device will beep when it’s done. You can check the food with a toothpick or a knife to see if it’s done.

Roast
The roast function is another useful and delicious function of the device. It uses hot air to cook the food thoroughly and create a tender and juicy texture inside and a crispy and caramelized texture outside. It is ideal for making roasted meat such as chicken, beef, pork and lamb. It can also be used to make roasted vegetables such as potatoes, carrots, onions and garlic. Some examples of food that can be roasted are:
- Whole chicken, turkey breast, duck and cornish hen
- Beef roast, pork loin, lamb leg and ham
- Potatoes, carrots, onions, garlic and parsnips
- Cauliflower, broccoli, brussels sprouts and asparagus
To use the roast function, follow these steps:
- Preheat the device for a few minutes by selecting the roast mode by pressing the “Roast” button on the control panel and setting the temperature using the “+” and “-” buttons. The recommended temperature range is between 325°F and 450°F depending on the type of food.
- Season or marinate the food according to your preference and place it in a roasting pan or rack that fits inside the device. You can use metal or ceramic roasting pans or racks as long as they are oven-safe.
- Place the roasting pan or rack on the baking tray that comes with the device.
- Place the baking tray on the glass turntable in the center of the device.
- Set the time using the “+” and “-” buttons or use one of the preset menu options for common foods such as chicken, beef, pork and more by pressing the “Menu” button and selecting one of the 10 options.
- Press start and wait for your food to be ready. The device will beep when it’s done. You can check the food with a meat thermometer or a fork to see if it’s done.
Broil
The broil function is another great and easy function of the device. It uses intense heat from the top heating element to cook the food quickly and create a charred and crispy texture on the food surface. It is ideal for making grilled food such as cheese, burgers, steaks and seafood. It can also be used to melt cheese, toast bread or brown food. Some examples of food that can be broiled are:
- Cheese sandwiches, grilled cheese, nachos and cheese dip
- Burgers, steaks, chops and ribs
- Salmon, shrimp, scallops and lobster
- Bread, garlic bread, croutons and toast
- Casseroles, lasagna, pizza and quiche
To use the broil function, follow these steps:
- Preheat the device for a few minutes by selecting the broil mode by pressing the “Broil” button on the control panel. The temperature is fixed at 450°F for this mode.
- Place the food in a broiling pan or rack that fits inside the device. You can use metal or ceramic broiling pans or racks as long as they are oven-safe.
- Place the broiling pan or rack on the baking tray that comes with the device.
- Place the baking tray on the glass turntable in the center of the device.
- Set the time using the “+” and “-” buttons or use one of the preset menu options for common foods such as cheese, burger, steak and more by pressing the “Menu” button and selecting one of the 10 options.
- Press start and wait for your food to be ready. The device will beep when it’s done. You can check the food with a spatula or a knife to see if it’s done.
Defrost
The defrost function is another handy and convenient function of the device. It uses low power microwave waves to thaw frozen food gently and evenly without cooking it. It is ideal for defrosting meat, poultry, seafood and vegetables before cooking them. Some examples of food that can be defrosted are:
- Chicken breasts, thighs, wings and drumsticks
- Beef roast, steak, ground beef and stew meat
- Pork chops, loin, ribs and ham
- Fish fillets, shrimp, scallops and crab
- Peas, corn, carrots and broccoli
To use the defrost function, follow these steps:
- Place the frozen food in a microwave-safe container or dish and cover it with a lid or a vented plastic wrap.
- Place the container or dish on the glass turntable in the center of the device.
- Select the defrost mode by pressing the “Defrost” button on the control panel.
- Set the weight of the food using the “+” and “-” buttons or use one of the preset menu options for common foods such as chicken, beef, pork and more by pressing the “Menu” button and selecting one of the 10 options.
- Press start and wait for your food to be defrosted. The device will beep when it’s done. You can check the food with a fork or a knife to see if it’s thawed.
These are the 6 functions of the Toshiba 6-in-1 Microwave/Air Fryer Combo and how to use them. By using these functions, you can make a variety of dishes with ease and convenience. You can also mix and match different functions to create your own recipes and combinations. The Toshiba 6-in-1 Microwave/Air Fryer Combo is a device that can do it all and make your cooking experience more enjoyable and satisfying.

Some tips and tricks for using the Toshiba 6-in-1 Microwave/Air Fryer Combo
To get the most out of your Toshiba 6-in-1 Microwave/Air Fryer Combo, here are some tips and tricks to keep in mind:
- Always read the user manual before using the device for the first time and follow the safety instructions.
- Always use oven mitts or gloves when handling hot accessories or food.
- Always clean the device and accessories after each use to prevent grease buildup and odors.
- Always preheat the device for a few minutes before using the air fry, bake, roast or broil mode for better results.
- Always spray or coat the food with a thin layer of oil before using the air fry mode for crispier results.
- Always leave some space between the food pieces when using the air fry mode for better air circulation.
- Always check the food halfway through the cooking time and flip or stir if needed for even browning.
Grab Yours HERE
FAQs
Here are some frequently asked questions about the Toshiba 6-in-1 Microwave/Air Fryer Combo:
How big is the Toshiba 6-in-1 Microwave/Air Fryer Combo?
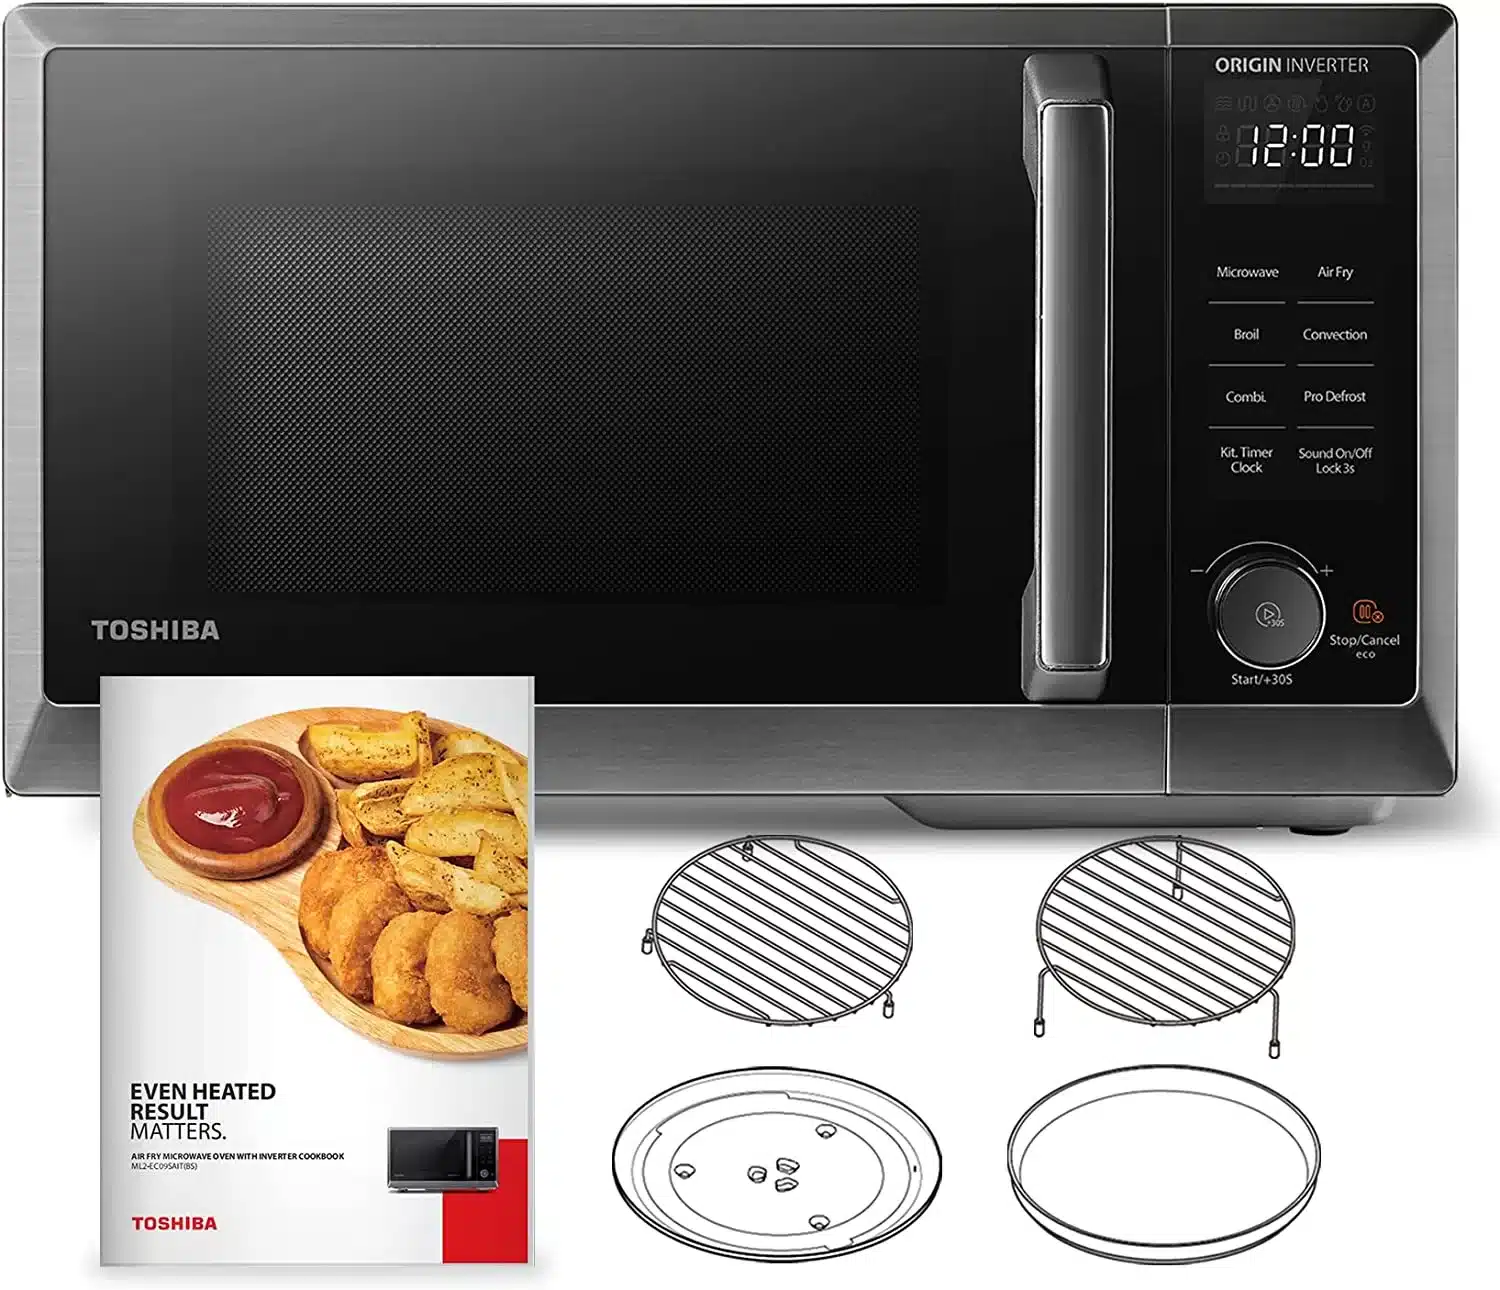
The Toshiba 6-in-1 Microwave/Air Fryer Combo has a capacity of 1.2 cubic feet and a power of 1000 watts for microwave mode and 1750 watts for other modes. It measures 22 x 13 x 17 inches and weighs 40 pounds.
How much does the Toshiba 6-in-1 Microwave/Air Fryer Combo cost?
The Toshiba 6-in-1 Microwave/Air Fryer Combo costs $249.99 on Amazon.com. It comes with a one-year warranty and a user manual.
What are some of the features of the Toshiba 6-in-1 Microwave/Air Fryer Combo?
The Toshiba 6-in-1 Microwave/Air Fryer Combo has many features that make it easy and convenient to use. Some of them are:
- A digital control panel with LED display and touch buttons
- A smart sensor function that automatically adjusts the time and power level based on the food type and weight
- A preset menu function that offers 10 options for common foods such as popcorn, pizza, potato and more
- A sound on/off function that allows you to mute or unmute the beeping sound
- A child lock function that prevents accidental operation by children
- A stainless steel interior and exterior that are easy to clean and durable
- A glass turntable that rotates for even heating
- An air fry basket that holds up to 2.2 pounds of food
- A baking tray that holds up to 9 x 13 inches of food
How do I clean the Toshiba 6-in-1 Microwave/Air Fryer Combo?
Cleaning the Toshiba 6-in-1 Microwave/Air Fryer Combo is very simple. Here are some steps to follow:
- Unplug the device and let it cool down completely before cleaning.
- Wipe the exterior of the device with a damp cloth and dry it with a soft cloth.
- Wipe the interior of the device with a damp cloth or sponge and dry it with a soft cloth.
- Remove any food particles or grease from the glass turntable, air fry basket and baking tray using warm water and mild detergent. Rinse them well and dry them thoroughly.
- Do not use abrasive cleaners or metal utensils to clean any part of the device.
Where can I buy the Toshiba 6-in-1 Microwave/Air Fryer Combo?
You can buy the Toshiba 6-in-1 Microwave/Air Fryer Combo online from Amazon.com or from other authorized retailers. You can also visit Toshiba’s official website for more information and customer service.
Conclusion
The Toshiba 6-in-1 Microwave/Air Fryer Combo is a game-changer for anyone who loves to cook and eat. It can do everything from microwaving to air frying, from baking to roasting, from broiling to defrosting. It can make your food healthier, tastier and faster. It can save you space, money and time. It can give you more options, creativity and fun. It’s the ultimate cooking device that you need in your kitchen.
If you are looking for a way to revolutionize your cooking experience, look no further than the Toshiba 6-in-1 Microwave/Air Fryer Combo. It’s a posho wosho device that will make you feel like a master chef in no time. Trust me, I have one and I love it. You will too.
So what are you waiting for? Order yours today from Presstocook.com and get ready to enjoy the best food of your life.